After installing xampp the ubuntu users might face some problems, I will discuss the problem and the solution in this post.
At first have a look on how to install. [Click Here].
# The first problem may like error 404 not found....
Saturday, July 24, 2010
Wednesday, June 16, 2010
Installing Samba in ubuntu 9.10
Step 1:
On the Terminal the following command was given one after another.
For LAN now we have to set up a manual IPV4 address and other related settings. In our case our IP address is 192.168.0.1 with 255.255.255.0 subnet mask.
On the Terminal the following command was given one after another.
sudo apt-get install sambaStep 2:
sudo apt-get install smbfs
For LAN now we have to set up a manual IPV4 address and other related settings. In our case our IP address is 192.168.0.1 with 255.255.255.0 subnet mask.
Wednesday, February 3, 2010
Installing Apache Tomcat server in ubuntu 9.04
To install Apache tomcat 6 server, we will follow some steps, they are described below:
Step1 : [ Adding sources ]
In this step we will add a third party source.
source Address:
deb http://us.archive.ubuntu.com/ubuntu/ jaunty multiverse
deb-src http://us.archive.ubuntu.com/ubuntu/ jaunty multiverse
just copy this and paste to ur sources.list file
To know how to add sources please visit this post.
step2 : [ Installing java jdk6 ]
To install this open the terminal and type or copy paste the following command.
" sudo apt-get install sun-java6-jdk "
Now jdk will be start installing please follow the on screen commands.
step3: [ Installing Tomcat server ]
" sudo apt-get install tomcat6 "
write the above command on the terminal and follow the on screen command.
step4 : [ Installing tomcat docs, examples and admin panel]
" sudo apt-get install tomcat6-docs tomcat6-examples tomcat6-admin "
write the following command on the terminal and follow the onscreen command.
==========================================
Your Installation is done.
now open any web browser and on its address bar type
" http://localhost:8080"
if you get a page containg IT WORKS message ur server is running Ok.
=============================================
Important Notes:
1. This server starts automatically every time when the system starts.
2. If you manually start or stop this server please follow the following commands and put them on the terminal.
" sudo /etc/init.d/tomcat6 start " [ To start the server ]
" sudo /etc/init.d/tomcat6 stop " [To stop the server ]
" sudo /etc/init.d/tomcat6 restart " [ To restart the server ]
3. All files regarding this server installation are located at this Location:
" /usr/share/tomcat6 " directory.
4. Webapps folder located at " /var/lib/tomcat6/webapps " location.
Adding package repository sources to source list in ubuntu
To add sources to source list we can follow either Terminal mode Or from the GUI mode we can add sources to source.list file.
I will describe both the ways....
From Terminal:
# At first open the terminal [ Application>>Accessories>>Terminal ]
# Then write the following command on the terminal [Except the "" marks]
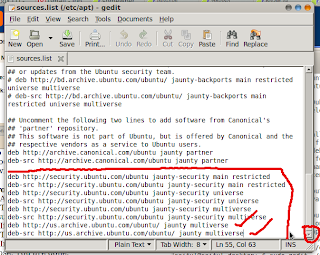
" sudo gedit /etc/apt/sources.list "
# If required provide the sudo password or your user password.
# Then a new window will open.
# In that window at last of that window just add your sourcess and save the file and close. You are done.
# Now write " sudo apt-get update " in the terminal.
Now it is updated.
From GUI Mode:
To add sources from GUI mode,
#Click on System>>Administration>>Software sources.
#If required give ur sudo password.
#A new window will come , in that window select Third party software tab and at the bottom left corner u will get an ADD button. Click on that, A text box will appear and paste your source there and press ok.
#Now close the window and u will be prompted to update ur aptitude list. click ok there. You are done.

I will describe both the ways....
From Terminal:
# At first open the terminal [ Application>>Accessories>>Terminal ]
# Then write the following command on the terminal [Except the "" marks]
" sudo gedit /etc/apt/sources.list "
# If required provide the sudo password or your user password.
# Then a new window will open.
# In that window at last of that window just add your sourcess and save the file and close. You are done.
# Now write " sudo apt-get update " in the terminal.
Now it is updated.

From GUI Mode:
To add sources from GUI mode,
#Click on System>>Administration>>Software sources.
#If required give ur sudo password.
#A new window will come , in that window select Third party software tab and at the bottom left corner u will get an ADD button. Click on that, A text box will appear and paste your source there and press ok.
#Now close the window and u will be prompted to update ur aptitude list. click ok there. You are done.

Friday, January 29, 2010
Installing TP-link WN620G wireless adapter in ubuntu 9.04
To install this device in ubuntu 9.04 U have to follow the following steps....
1:
First Install the ndiswrapper driver. To know how to install see this.
2:
Now download the windows driver from Here.
3:
Now unzip the folder and from the terminal locate the drivers location.
For example in this package the files are located like this
Desktop/2007116174835/Win2000_XP/DriverFiles/
4:
Now write the following commands in terminal: (except "" marks)
>>" sudo ndiswrapper -i net5523.inf "
Now check if it is installed or not : ( You may now insert the device in usb port)
write this in terminal " sudo ndiswrapper -l "
Now start the device by writing " sudo modprobe ndiswrapper " in terminal.
Now u will see ur device led blinking. Now u can set ur wireless network.
ON my next post I will describe how to setup or connect to a wireless network.
=================================
For the details documentation u may follow the link below:
https://help.ubuntu.com/community/WifiDocs/Device/TP-Link_TL-WN620G_(ndiswrapper)
Subscribe to:
Posts (Atom)